Adobe Lightroom presets are powerful tools that can streamline your photo editing workflow and help you achieve stunning results with just a few clicks. Whether you’re using Lightroom Classic, Lightroom CC, or Lightroom Mobile on Android or iOS, installing and importing presets is a straightforward process. In this article, we’ll walk you through the steps for each version of Lightroom, ensuring you can make the most of your presets across all platforms.

Installing and Importing Lightroom Presets on Lightroom Classic
Adobe Lightroom Classic is the preferred choice for professional photographers and advanced enthusiasts. Supported formats of presets in Adobe Lightroom Classic are.XMP files. Here’s how to install and import presets:
Method 1: Installing Presets Using the “Import Presets” Option
- Begin by downloading the Lightroom presets you want to install on your computer. Presets usually come in .xmp or .lrtemplate (old versions) file formats.
- Click on the “Develop” module in the top-right corner of the Lightroom Classic interface.
- On the left-hand side of the Develop module, you’ll see the “Presets” panel. If you can’t see it, click the small triangle to expand it.
- Right-click on the “Presets” panel and select “Import.”
- A file dialog box will appear. Use it to navigate to the location where you downloaded your presets.
- Select the preset files you want to install.
- After selecting your preset files, click the “Import” button.
- (Optional) Lightroom Classic allows you to organize your imported presets into folders for easy access. To do this, right-click within the “Presets” panel and choose “New Folder.” Name the folder and drag presets into it.
- Your imported presets will now appear in the “Presets” panel under the “User Presets” section.
- To apply a preset to a photo, click on the preset name. Lightroom will automatically apply the preset’s adjustments to the selected image.
Method 2: Drag and Drop Presets into Lightroom Classic
- Download the Lightroom presets you want to install to your computer.
- Open your computer’s file explorer (Windows) or Finder (macOS) and navigate to the location where you downloaded the presets.
- Select the preset files you want to import and drag them directly onto the Lightroom Classic window.
- Lightroom Classic will automatically detect the dragged preset files and display a dialog box titled “Import Presets.” Ensure the “Import” option is selected and click “Import.”
- As in the previous method, you can create folders to organize your imported presets within the “Presets” panel.
- Your imported presets will be available in the “Presets” panel under “User Presets.”
- To apply a preset to a photo, click on the preset name, and Lightroom Classic will apply the preset adjustments to the selected image.
Method 3: Importing Presets via Lightroom Classic Preferences
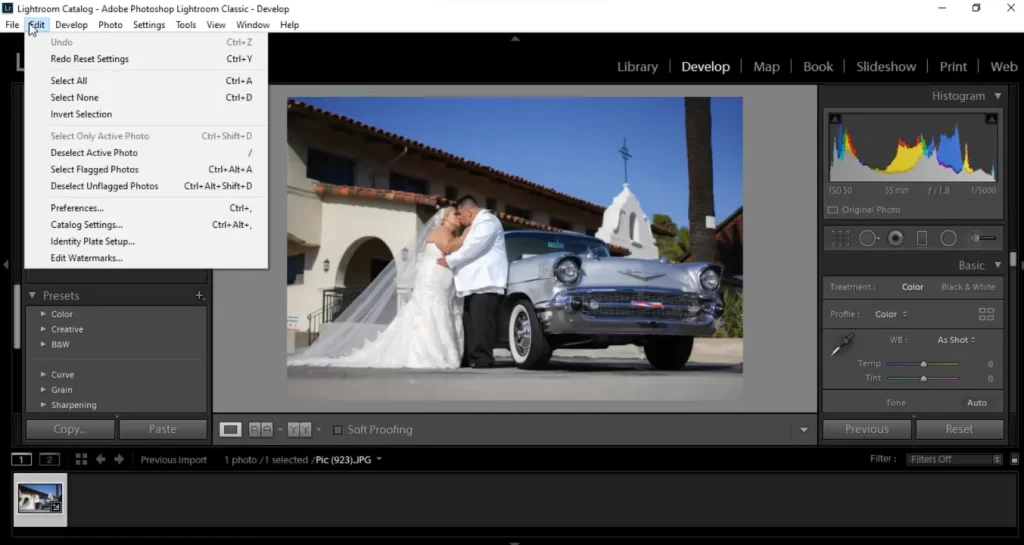
- How to import presets in Lightroom classicOn a macOS computer, go to “Lightroom Classic” (in the top menu bar) > “Preferences.”
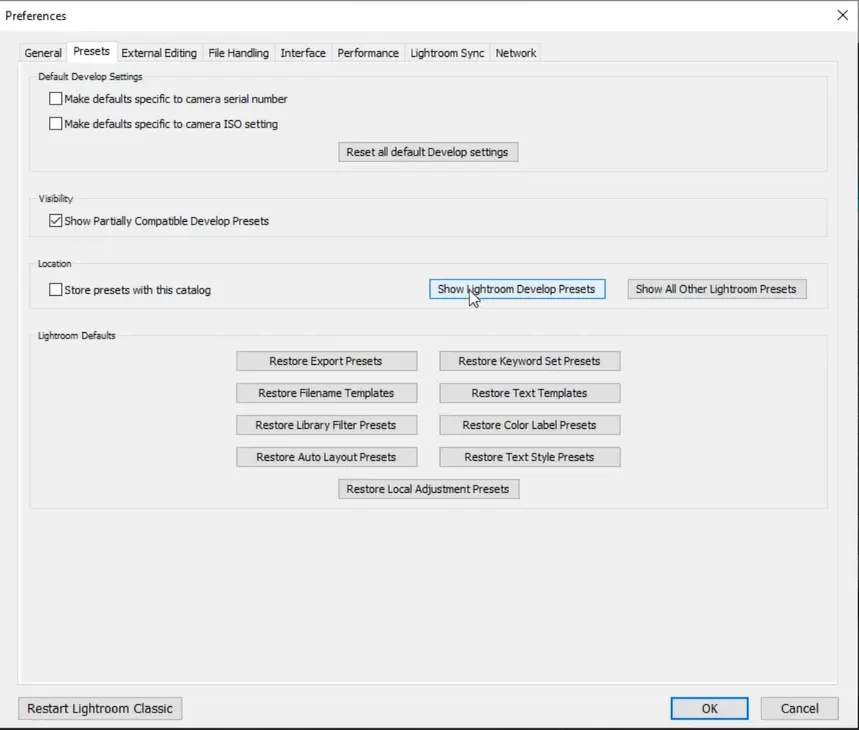
- In the Preferences dialog box, click on the “Presets” tab.
- Within the Presets tab, there is a button labeled “Show Lightroom Develop Presets.” Click on it.
- In the Develop Presets folder, you can either copy or move the preset files you downloaded earlier. You can create subfolders within this folder to organize your presets if desired.
- Close and then reopen Lightroom Classic (Restart Lightroom Classic) to ensure it recognizes the newly added presets.
- Your imported presets will now be available in the “Presets” panel under “User Presets.” You can apply them to your photos by clicking on the preset name.


Import Lightroom Presets on Lightroom Mobile
Method 1: Synchronization with Lightroom Desktop:
When you import presets in Lightroom Desktop/ Lightroom cc, these presets are automatically saved to your Mobile app of Lightroom due to Adobe Creative Cloud synchronization between cross platforms. So, once you have imported presets to your Lightroom desktop and your Mobile app is connected to the cloud, you don’t have to worry about importing them separately on your Mobile.
Method 2: Import using DNG files
- Start by downloading the Lightroom Mobile presets in DNG format. These DNG files may come bundled with preset settings applied to them.
- To import DNG files, tap the “+” icon or “Add Photos” option (the specific wording may vary depending on your version of Lightroom Mobile).
- Select the “From Files” option.
- Navigate to the folder where you downloaded the DNG files.
- Select the DNG files you want to import. You can select multiple files at once.
- After selecting the DNG files, tap the “Add” or “Import” button to bring them into Lightroom Mobile.
- In the options menu, choose “Create Preset” or a similar option, allowing you to save the current editing settings as a preset.
- A dialog box will appear where you can name your preset. Give it a descriptive name that reflects the style or adjustments applied.
- (Optional) You can choose to place the new preset in an existing preset group or create a new group to organize your presets, depending on your preference.
- After naming and selecting a group (if desired), tap the “Save” or “Create” button to save the preset.
- The newly created preset is now available in your Lightroom Mobile presets library. To apply it to other photos, open a different photo in Lightroom Mobile, go to the “Presets” section, and select the newly created preset.
- To apply the preset settings to other photos, open a different photo in Lightroom Mobile. Go to the “Presets” section and choose the preset you saved or imported.
- After applying the preset, you can make additional adjustments to your photo using the editing tools available in Lightroom Mobile to achieve your desired look.
- Save or Export Your Edited Photo: – Once you’re satisfied with the edits, save or export the edited photo.

Method 2: Import user presets (recommended and easy method)
- Launch the Lightroom Mobile app on your Android or iOS device.
- Open a photo you want to edit or create a new project.
- At the bottom of the screen, tap the “Presets” icon.
- At the top right corner click on the 3 dots icon and then select “import presets”
- A file browser will appear, allowing you to select the preset files you want to import. Navigate to the folder where your preset files are located
- Tap on the preset files (usually in .dng) you want to import. You can select multiple preset files at once if needed.
- After selecting the preset files, tap “Import” or “Add” to import them into Lightroom Mobile.
- Your imported presets will now appear in the Presets panel, ready to use.
- To apply a preset to a photo, tap on the preset name, and Lightroom Mobile will apply the preset’s adjustments to the selected image.
- After applying a preset, you can make further adjustments to your photo using the editing tools available in Lightroom Mobile to achieve your desired look.
Conclusion
I hope you are now capable of importing your beautiful photos into your Lightroom. If you are confused with all these methods, just pick one method and start working, if it’s working for you, there is no need to try different methods. There is no need to read the complete article by the way if you have found the solution.
FAQs
What is the difference between Lightroom Classic and Lightroom CC when it comes to importing photos?
Lightroom Classic and Lightroom CC have slightly different import processes. In Lightroom Classic, you typically use the “Import” dialog to import photos from your computer, camera, or external drives. In Lightroom CC, the import process is simpler and more integrated with cloud storage, making it easy to import and access photos across devices.
Can I import photos from an external hard drive or USB drive into Lightroom?
Yes, you can import photos from external drives. When you connect the drive to your computer and open Lightroom, it should recognize the external drive in the import dialog. You can then select the photos you want to import.
What should I do if my imported photos are missing or show as ‘offline’ in Lightroom?
If your imported photos are missing or offline, it’s usually due to the files being moved or renamed outside of Lightroom. To resolve this, right-click on the folder or photo in the Library module and choose “Locate Missing Photos” or “Update Folder Location” to reconnect them.
FAQ 5: Can I import and edit RAW photos in Lightroom?
Yes, Lightroom supports RAW photo formats from various camera manufacturers. Importing and editing RAW files in Lightroom allows you to retain the highest quality and flexibility for post-processing.
Does Lightroom have an automatic import feature for photos on my camera or smartphone?
Yes, Lightroom can automatically import photos from your camera or smartphone when connected to your computer. You can set up auto-import by configuring your import settings in Lightroom.
Can I undo an import if I accidentally imported the wrong photos?
Yes, you can undo an import in Lightroom. Simply select the imported photos you want to remove, right-click, and choose “Remove” or “Delete from Disk.” Be cautious with this option, as it permanently deletes the selected photos from your storage.


